
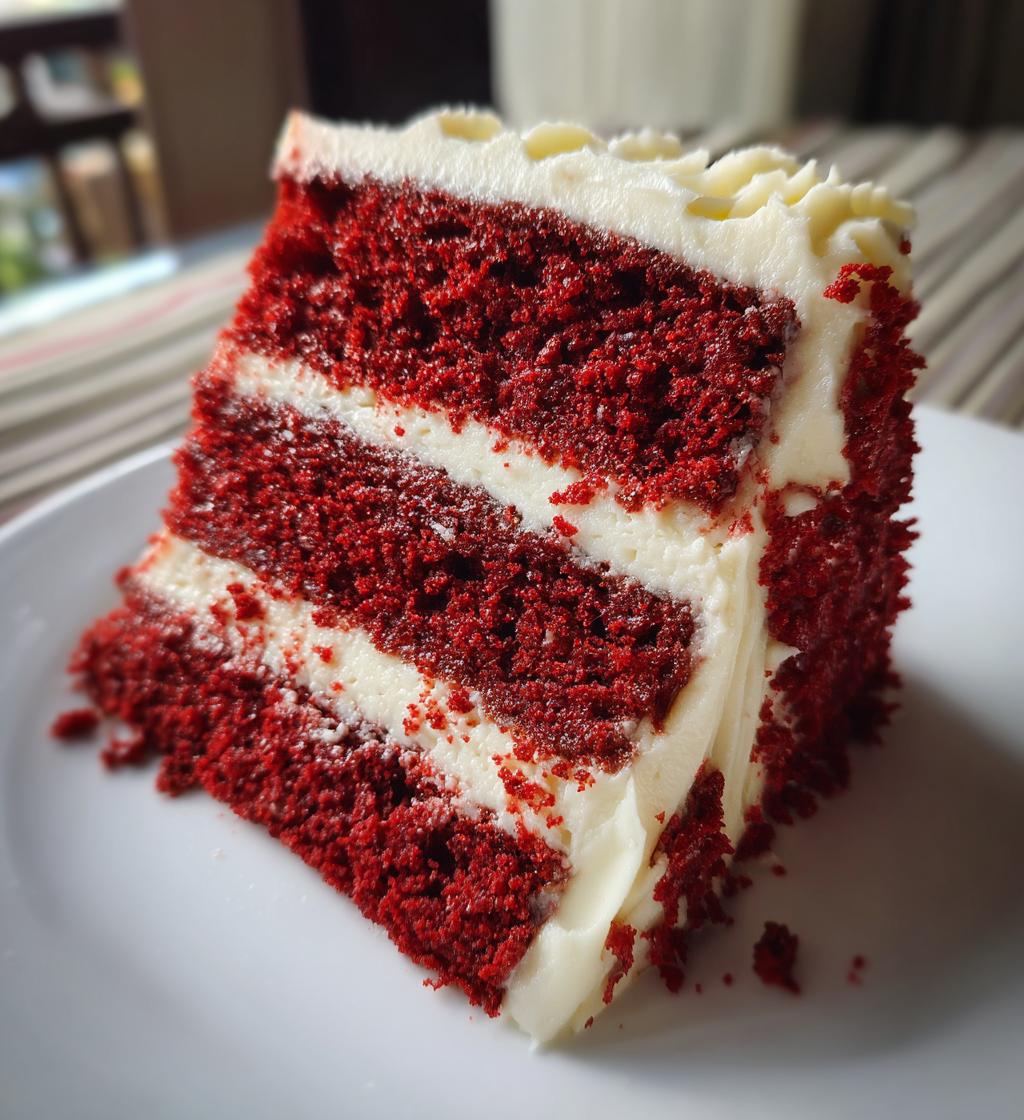
Ah, Valentine’s cakes! They’re like a sweet hug for your heart, aren’t they? There’s something so enchanting about a cake that’s not only delicious but also draped in love and affection. Imagine a rich, velvety slice of chocolate cake, the kind that melts in your mouth, beautifully colored in shades of red, just perfect for this special day. The charm of these cakes lies in their ability to bring joy and create unforgettable moments. Whether you’re celebrating with a partner, friends, or even treating yourself, Valentine’s cakes are all about sharing sweetness and spreading love.
With their stunning appearance and delightful flavors, they can transform any gathering into a celebration of love. Plus, they’re surprisingly easy to whip up! So, get ready to impress your loved ones with a homemade cake that not only looks fabulous but tastes even better. Trust me, you’ll want to keep this recipe in your back pocket for all your future Valentine’s Day celebrations!
Ingredients List
Here’s what you’ll need to create your delightful Valentine’s cakes. Gather these ingredients, and let’s get baking!
- 2 cups all-purpose flour
- 1 1/2 cups sugar
- 1 cup unsalted butter, softened
- 4 large eggs
- 1 cup milk
- 2 tsp baking powder
- 1 tsp vanilla extract
- 1/2 cup cocoa powder
- 1/4 cup red food coloring
Make sure to measure everything accurately for the best results—trust me, it makes all the difference! Now that we have our ingredients ready, let’s move on to the fun part: baking!
How to Prepare Instructions
Now, let’s get into the nitty-gritty of baking these delightful Valentine’s cakes! Follow my step-by-step guide, and you’ll have a gorgeous cake ready to impress in no time.
Preheat the Oven
First things first, you’ll want to preheat your oven to 350°F (175°C). Preheating is a crucial step because it helps your cakes rise evenly and bake perfectly. So, while you’re prepping your ingredients, let that oven warm up—trust me, this step is essential for a beautiful bake!
Prepare the Cake Pans
Next, grab your two 9-inch round cake pans. Greasing and flouring these pans is vital to ensure your cakes come out smoothly. I like to use a bit of unsalted butter to coat the inside of the pans, making sure to cover every corner. Then, sprinkle some flour and shake it around, tapping out the excess. This creates a non-stick layer that’s a lifesaver when it’s time to flip those cakes out!
Mix Dry Ingredients
In a medium bowl, combine 2 cups of all-purpose flour, 2 teaspoons of baking powder, and 1/2 cup of cocoa powder. Whisk them together until they’re well blended. This step ensures that your leavening agent is evenly distributed, which is key for that perfect rise. Plus, the cocoa will be evenly integrated for a rich flavor throughout!
Cream Butter and Sugar
Now, let’s get to the fun part—creaming the butter and sugar! In a large mixing bowl, beat 1 cup of softened unsalted butter with 1 1/2 cups of sugar until it’s light and fluffy. I usually do this for about 3-4 minutes with a hand mixer. You want it to look pale and airy—this step is what makes your cake tender and delicious!
Incorporate Eggs
Time to add the magic of eggs! Crack in 4 large eggs, one at a time, mixing well after each addition. This allows for better emulsification, creating that dreamy texture we all love. Don’t rush this step; it’s worth it to ensure everything is well combined!
Add Milk and Vanilla
Next, pour in 1 cup of milk and 1 teaspoon of vanilla extract to the mixture. Stir gently until everything is incorporated. The milk adds moisture, while the vanilla gives a lovely depth of flavor that complements the chocolate beautifully!
Combine Dry and Wet Ingredients
Now, it’s time to bring it all together! Gradually add your dry ingredient mixture to the wet ingredients, mixing gently until you achieve a smooth batter. It’s important not to overmix; just stir until there are no more flour streaks. This helps keep your cake light and fluffy!
Add Red Food Coloring
Here comes the fun part—adding that vibrant red food coloring! Pour in 1/4 cup and mix it well until the batter is evenly colored. This will give your cakes that stunning, eye-catching hue that’s perfect for Valentine’s Day!
Bake the Cakes
Pour the batter evenly into your prepared pans and pop them into your preheated oven. Bake for 30-35 minutes. You’ll know they’re done when a toothpick inserted in the center comes out clean, and the edges start to pull away from the pan. The aroma will fill your kitchen, and you’ll be counting down the minutes!
Cool the Cakes
Once baked, remove the cakes from the oven and let them cool in the pans for about 10 minutes. After that, carefully flip them onto a wire rack to cool completely. This step is crucial—patience is key here! You don’t want to frost a warm cake, or the frosting will melt away into a gooey mess.
Why You’ll Love This Recipe
There are so many reasons to fall head over heels for these Valentine’s cakes! Here are just a few of the delightful benefits that make this recipe a must-try:
- Quick Preparation: You won’t spend all day in the kitchen! This recipe comes together in just under an hour, perfect for those last-minute celebrations.
- Delightful Taste: The rich chocolate flavor combined with the moist texture will have everyone asking for seconds. Seriously, it’s that good!
- Festive Appeal: With its vibrant red color, this cake is a showstopper that’s perfect for Valentine’s Day. It’s sure to impress your loved ones!
- Customizable: Feel free to get creative! Add your favorite frosting, sprinkles, or even fresh berries to personalize it and make it even more special.
- Perfect for Sharing: Whether it’s a romantic dinner or a gathering with friends, these cakes are great for sharing love and sweetness with everyone around you.
Trust me, once you try this recipe, it’ll become your go-to for all your Valentine’s celebrations!
Tips for Success
Want to ensure your Valentine’s cakes turn out absolutely perfect? I’ve got some tried-and-true tips that will help you avoid common pitfalls and elevate your baking game. Let’s dive in!
- Use Room Temperature Ingredients: Make sure your butter, eggs, and milk are at room temperature before you start mixing. This helps them combine more smoothly, resulting in a lighter cake. Take them out of the fridge about 30 minutes before you begin!
- Don’t Overmix: When combining the wet and dry ingredients, mix just until everything is incorporated. Overmixing can develop gluten in the flour, leading to a dense cake instead of the fluffy texture we want. Keep it gentle!
- Check Your Oven Temperature: Ovens can be tricky, and even if you set it to 350°F (175°C), it might be off. I recommend using an oven thermometer to ensure accuracy. A cake that bakes too hot or too cold can lead to inconsistent results.
- Cool Completely: Patience is key! Let your cakes cool completely on a wire rack before frosting. If you frost while they’re warm, the frosting will melt off, and we definitely don’t want that!
- Experiment with Frosting: While a classic cream cheese frosting is fantastic, don’t hesitate to get creative! Try pairing this cake with a whipped chocolate ganache or a fluffy vanilla buttercream. Each option can give your cake a unique twist!
- Decorate with Love: When it comes to decorating, let your creativity shine! Fresh strawberries, chocolate shavings, or edible flowers can add a lovely touch. Plus, it makes your cake even more enticing!
With these tips in your back pocket, you’ll be well on your way to baking the most impressive Valentine’s cakes! Enjoy the process, and happy baking!
Nutritional Information Section
Here’s the estimated nutritional breakdown for each slice of your delightful Valentine’s cakes. Keep in mind that these values are approximate and can vary based on specific ingredients and portion sizes.
- Calories: 350
- Fat: 15g
- Saturated Fat: 9g
- Unsaturated Fat: 4g
- Trans Fat: 0g
- Cholesterol: 70mg
- Sodium: 200mg
- Carbohydrates: 50g
- Fiber: 2g
- Protein: 4g
- Sugar: 25g
These numbers make it easy to plan your indulgence! Enjoy every bite, and remember, it’s all about balance on special occasions like Valentine’s Day!
FAQ Section
Got questions about making the perfect Valentine’s cakes? No worries, I’ve got you covered! Here are some common queries I often hear, along with my heartfelt answers to help you bake with confidence.
What’s the difference between a red velvet cake and a chocolate cake?
Ah, the classic debate! While both cakes are deliciously rich, red velvet cake has a subtle cocoa flavor and is traditionally paired with cream cheese frosting, giving it that signature tang. The real star, though, is the vibrant red color, which is achieved with red food coloring. On the other hand, a chocolate cake is richer in cocoa and typically has a denser texture. So, if you’re looking for something visually stunning for Valentine’s Day, a red velvet cake is your best bet!
Can I make these Valentine’s cakes ahead of time?
You absolutely can! These cakes are great for making ahead. Just bake them, let them cool completely, and wrap them tightly in plastic wrap. They can be stored in the fridge for up to 3 days or in the freezer for up to a month. When you’re ready to enjoy, simply thaw and frost them. It’s a fantastic way to save time on the big day!
What frosting works best for Valentine’s cakes?
While I adore cream cheese frosting for its tangy flavor that complements the chocolate perfectly, you can get creative! A silky chocolate ganache or a fluffy vanilla buttercream can also elevate your Valentine’s cakes. If you’re feeling adventurous, try adding a hint of raspberry or peppermint extract to your frosting for a fun twist!
How can I make these cakes gluten-free?
If you or your loved ones are gluten-sensitive, you can easily make this recipe gluten-free! Just substitute the all-purpose flour with a high-quality gluten-free flour blend. Be sure to check that your baking powder is gluten-free as well. The texture might be slightly different, but you’ll still end up with a delicious Valentine’s cake that everyone can enjoy!
Can I decorate these cakes in advance?
Yes, you can! If you’re planning to decorate your Valentine’s cakes ahead of time, just make sure to store them in an airtight container in the fridge. This will keep your frosting fresh and prevent it from drying out. Just be mindful that decorations like fresh fruit should be added closer to serving time for the best appearance and taste!
Storage & Reheating Instructions
Now that you’ve baked these delightful Valentine’s cakes, you might be wondering how to store any leftovers (if there are any, but let’s be honest, they might disappear quickly!). Here’s how to keep your cakes fresh and delicious!
First off, allow your cakes to cool completely if you haven’t already done so. Once they’re cool, you can store them in an airtight container to keep them moist. If you’re planning to eat them within a couple of days, just pop them in the fridge. They’ll stay fresh for about 3-4 days. Just remember to cover them well to prevent them from absorbing any odors from the fridge!
If you want to keep your cakes for a longer period, consider freezing them. Wrap each cake layer tightly in plastic wrap and then place them in a freezer-safe bag or container. They can be frozen for up to a month. When you’re ready to enjoy them, simply take them out of the freezer and let them thaw in the fridge overnight. This gradual thawing helps maintain their texture!
When it comes to reheating, if you prefer a warm slice, you can pop it in the microwave for about 10-15 seconds. Just be careful not to overheat it, or it can become dry! If you’re reheating an entire cake, I recommend placing it in a preheated oven at 350°F (175°C) for about 10 minutes. This will warm it through without compromising the cake’s lovely texture.
Following these storage and reheating tips will ensure that your Valentine’s cakes taste as delightful as they did on the day you made them. Enjoy your sweet creations!
Serving Suggestions
Now that you’ve baked up these beautiful Valentine’s cakes, let’s talk about how to elevate the entire dining experience! The right accompaniments can take your cake from delightful to absolutely unforgettable. Here are some scrumptious ideas that pair perfectly with your Valentine’s cakes:
- Fresh Berries: A sprinkle of fresh strawberries, raspberries, or blueberries not only adds a pop of color but also a refreshing contrast to the rich, chocolatey flavor of the cake. Plus, they look gorgeous on the plate!
- Whipped Cream: Light and fluffy whipped cream is a classic companion to any cake. You can sweeten it with a touch of vanilla or even a hint of almond extract for a delightful twist. Serve it on the side, or dollop it right on top for an indulgent touch!
- Ice Cream: Who can resist a warm slice of cake paired with a scoop of vanilla or chocolate ice cream? It’s the ultimate comfort food combination! For a romantic twist, try a scoop of raspberry sorbet for a lovely contrast.
- Coffee or Espresso: A cup of freshly brewed coffee or a rich espresso enhances the flavors of your Valentine’s cake beautifully. The slight bitterness of coffee balances the sweetness and makes for a cozy dessert experience.
- Chocolate Ganache: Drizzle some warm chocolate ganache over your cake slices for an extra layer of decadence. It’s a chocolate lover’s dream come true and adds a luxurious touch.
- Fruit Compote: A homemade fruit compote made with berries, peaches, or even cherries can add a lovely, tangy contrast to the sweetness of your cake. Just simmer the fruit with a bit of sugar until it’s syrupy and thick—yum!
- Decorative Touches: For an extra special presentation, consider adding edible flowers or a dusting of powdered sugar on top of the cake. It not only looks stunning but adds a touch of elegance to your dessert table.
These serving suggestions will definitely enhance the overall experience and make your Valentine’s cakes even more memorable. Whether you’re hosting a romantic dinner or a fun gathering with friends, these ideas will impress everyone at your table!
Print
valentines cakes: 7 Sweet Ideas to Melt Your Heart
Delicious cakes perfect for Valentine’s Day.
- Total Time: 55 minutes
- Yield: 12 servings 1x
Ingredients
- 2 cups all-purpose flour
- 1 1/2 cups sugar
- 1 cup unsalted butter
- 4 large eggs
- 1 cup milk
- 2 tsp baking powder
- 1 tsp vanilla extract
- 1/2 cup cocoa powder
- 1/4 cup red food coloring
Instructions
- Preheat your oven to 350°F (175°C).
- Grease and flour two 9-inch round cake pans.
- In a bowl, mix flour, baking powder, and cocoa powder.
- In another bowl, cream butter and sugar until light and fluffy.
- Add eggs one at a time, mixing well after each addition.
- Stir in milk and vanilla extract.
- Gradually add dry ingredients and mix until smooth.
- Mix in red food coloring until well combined.
- Pour batter into prepared pans.
- Bake for 30-35 minutes or until a toothpick comes out clean.
- Let cakes cool before removing from pans.
Notes
- Use high-quality cocoa for better flavor.
- Adjust baking time based on your oven.
- Decorate with cream cheese frosting for a festive look.
- Prep Time: 20 minutes
- Cook Time: 35 minutes
- Category: Dessert
- Method: Baking
- Cuisine: American
- Diet: Vegetarian
Nutrition
- Serving Size: 1 slice
- Calories: 350
- Sugar: 25g
- Sodium: 200mg
- Fat: 15g
- Saturated Fat: 9g
- Unsaturated Fat: 4g
- Trans Fat: 0g
- Carbohydrates: 50g
- Fiber: 2g
- Protein: 4g
- Cholesterol: 70mg
Keywords: valentines cakes, chocolate cake, red velvet cake