Valentine’s Day is all about spreading love and sweetness, and what better way to do that than with a colorful treat like *valentines bark*? This delightful dessert is not only a feast for the eyes but also a breeze to whip up, making it perfect for anyone, even if you’re not a seasoned baker. I remember the first time I made this with my kids – the kitchen was filled with laughter and little hands eagerly sprinkling toppings everywhere. It turned into a fun family activity that brought us closer together while creating something delicious.
*Valentines bark* stands out because it’s a no-bake wonder, which means you can skip the oven and still impress your loved ones. Just melt some white chocolate, pour it out, and load it up with vibrant M&M’s and crunchy peppermint candies. It’s a simple process that encourages creativity, allowing you to customize it however you like. Trust me, once you see those bright colors and taste the sweet crunch, you’ll be hooked on making this treat every year! Let’s dive into the recipe and make some magic happen!
Ingredients List
To create the most delightful *valentines bark*, you’ll need just a few simple ingredients. Trust me, when I say, having everything prepped and measured makes the process feel so much smoother and more enjoyable!
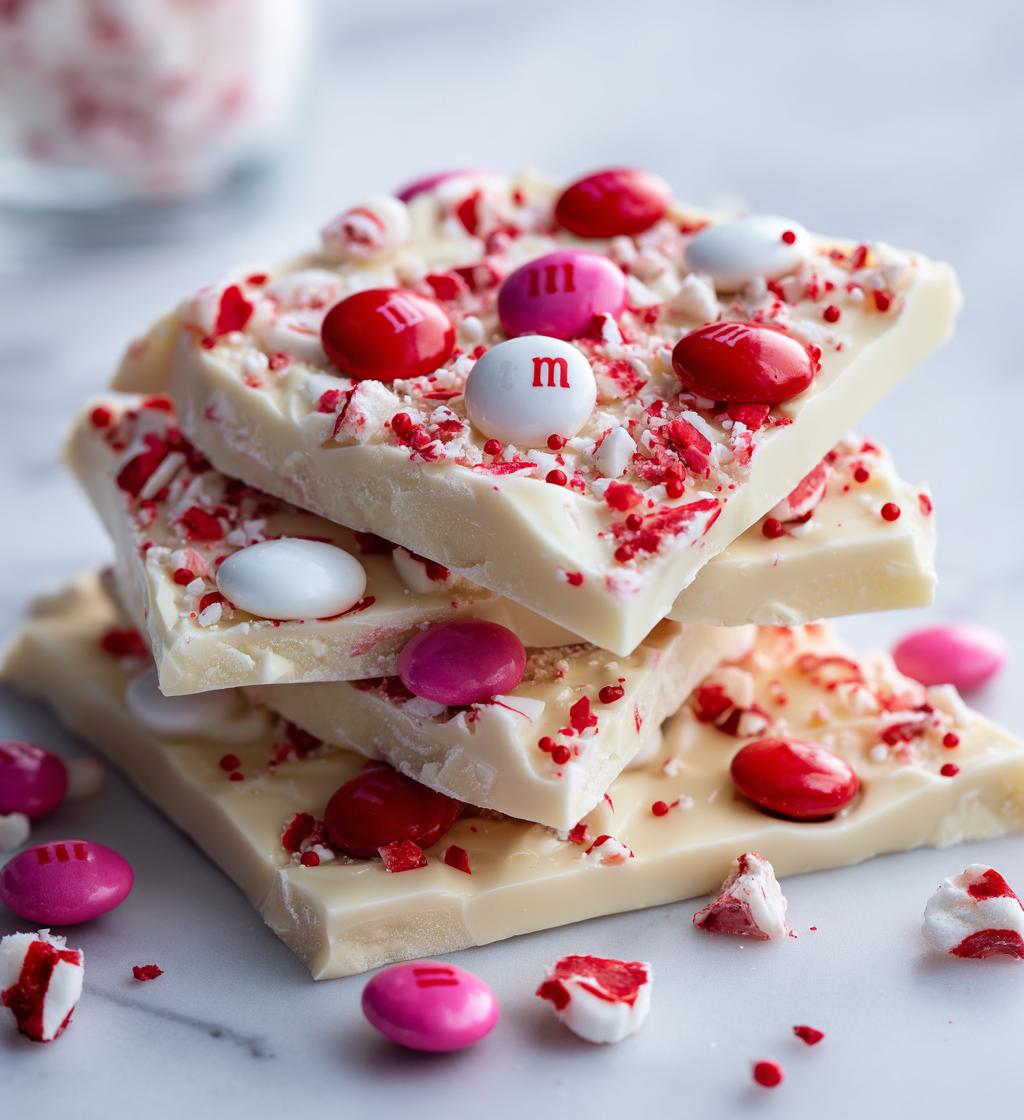
- 12 ounces white chocolate chips: This is the base of your bark, providing that creamy sweetness that everyone loves. Make sure to use good quality chocolate chips, as they melt beautifully and taste fantastic!
- 1 cup red and pink M&M’s: These colorful little gems not only add a pop of color but also a fun crunch. You can mix it up with other colors for different occasions, but for Valentine’s Day, red and pink are a must!
- 1/2 cup crushed peppermint candies: These add a delightful minty kick that contrasts perfectly with the sweetness of the chocolate. If you love mint, you’ll want to sprinkle these generously!
- 1/2 cup sprinkles: Because who doesn’t love sprinkles? They bring a festive flair and a little extra sweetness. Choose heart-shaped sprinkles for that extra touch of love!
Measuring accurately is key for the best results. This ensures that your *valentines bark* sets perfectly and has the right balance of flavors. Grab your measuring cups and let’s get ready to create something sweet!
How to Prepare Instructions
Making *valentines bark* is so simple, and I promise it’s a fun process! Let’s break it down step by step so you can create this colorful treat with ease. Get ready to impress your loved ones!
Step 1: Melt the Chocolate
First things first, grab a microwave-safe bowl and toss in your 12 ounces of white chocolate chips. You’ll want to melt them in the microwave, and I suggest heating them in 30-second intervals. Give it a stir after each interval until the chocolate is completely smooth and melted. This usually takes about 1 to 2 minutes total. Just be careful not to overheat it; burnt chocolate is a bummer!
Step 2: Prepare the Baking Sheet
While your chocolate is melting, line a baking sheet with parchment paper. This step is crucial because it ensures that your *valentines bark* will come off easily once it’s set. Trust me, trying to peel it off a pan without parchment is a sticky nightmare!
Step 3: Spread the Chocolate
Once your chocolate is melted and smooth, pour it onto the prepared baking sheet. Using a spatula, spread the chocolate evenly to form a nice rectangle or square—whatever shape you prefer! Aim for about 1/4 inch thick so that it’s not too fragile. The smoother you spread it, the prettier your bark will look once it’s set!
Step 4: Add Toppings
Now comes the fun part: adding your toppings! Sprinkle your 1 cup of red and pink M&M’s evenly over the melted chocolate, followed by the 1/2 cup of crushed peppermint candies and 1/2 cup of sprinkles. Get creative and make sure everything is distributed nicely. You want a little bit of everything in each bite – it’s all about that colorful presentation!
Step 5: Let it Set
Once you’ve topped your chocolate masterpiece, let it cool at room temperature until it’s completely set. This usually takes about 30-60 minutes. You can pop it in the fridge if you’re in a hurry, but room temperature is best for the best texture. Just be patient; the wait will be worth it!
Step 6: Break and Serve
Once it’s fully set, it’s time to break your *valentines bark* into pieces. I like to use my hands to snap it into chunks, but you can also use a sharp knife if you want cleaner edges. Serve it on a cute platter or package it up as a sweet gift. It looks adorable in a little cellophane bag tied with a ribbon! Everyone will love this colorful treat.
Why You’ll Love This Recipe
- Quick Prep Time: With just 15 minutes of prep, you can have this delightful treat ready to go. It’s perfect for those last-minute Valentine’s Day surprises!
- Colorful Presentation: The vibrant reds and pinks make *valentines bark* an eye-catching dessert that will surely impress your loved ones. It’s like a little piece of art!
- No-Bake Method: Forget the oven! This recipe is all about melting and mixing, making it an easy and stress-free option for anyone, regardless of baking experience.
- Versatile Toppings: Customize your bark to your heart’s content! Use different colors of M&M’s, add nuts for crunch, or swap in your favorite candies. The possibilities are endless!
Tips for Success
To make your *valentines bark* absolutely perfect, I’ve got a few pro tips to ensure you get the best results every time. Trust me, these little details can make a big difference!
Watch the Chocolate Carefully
One of the most important things to remember is to avoid overheating the white chocolate. It can be tempting to just blast it in the microwave, but chocolate is sensitive! Always melt it in 30-second intervals, stirring well in between. You want it to be smooth and silky, not lumpy or burnt. If it does get too hot, you can mix in a tiny bit of vegetable oil to help bring it back to life.
Get Creative with Toppings
The toppings are where you can let your imagination run wild! If you’re not a fan of peppermint, try adding crushed nuts, like almonds or pecans, for a delightful crunch. Want to switch things up? Use pastel colors and heart-shaped candies for a springtime treat, or even add dried fruits for a chewy texture. The best part about *valentines bark* is that it’s so versatile!
Chill for a Perfect Set
If you’re short on time, feel free to pop your baking sheet in the refrigerator to speed up the cooling process. Just be mindful not to leave it in for too long, as you want that perfect snap when breaking the bark. A quick 15-20 minutes in the fridge should do the trick!
Store Properly for Freshness
Once your *valentines bark* is ready, store it in an airtight container to keep it fresh. It will last for about a week, but I doubt it’ll last that long with how delicious it is! If you’re planning to make it ahead of time, just keep it out of direct sunlight to maintain those vibrant colors.
With these tips, you’ll be well on your way to creating a stunning and scrumptious *valentines bark* that everyone will adore. Happy baking!
Nutritional Information Section
Now that you’re all set to whip up your delicious *valentines bark*, let’s take a moment to talk about the nutritional information. It’s always good to know what you’re indulging in, right? Here’s a breakdown of the estimated values per piece of this delightful treat:
- Calories: 150
- Sugar: 14g
- Fat: 8g
- Saturated Fat: 5g
- Unsaturated Fat: 3g
- Trans Fat: 0g
- Carbohydrates: 18g
- Fiber: 1g
- Protein: 1g
- Cholesterol: 5mg
- Sodium: 30mg
Keep in mind that these values are estimates and can vary based on the specific brands or quantities of ingredients you use. But hey, when it comes to sweet treats like this, a little indulgence is totally worth it! Enjoy every colorful bite of your homemade *valentines bark* knowing it’s a delightful addition to your celebrations.
FAQ Section
Got questions about making the perfect *valentines bark*? You’re not alone! Here are some common queries I’ve come across, along with my answers to help you nail this delightful treat.
Can I use dark chocolate instead of white?
Absolutely! Dark chocolate can be a delicious twist on the classic *valentines bark*. Just keep in mind that the flavor will be a bit richer and less sweet, which some people might love even more! If you go this route, you may want to adjust the amount of sugar in your toppings to balance things out.
How do I store leftovers?
To keep your *valentines bark* fresh and tasty, store it in an airtight container at room temperature. It should last for about a week, but I doubt it’ll stick around that long! Just make sure to keep it away from direct sunlight to preserve those vibrant colors.
Can I make this ahead of time?
You bet! In fact, making your *valentines bark* a day or two in advance can save you time and stress. Just follow the recipe as usual, and once it’s set, store it in an airtight container. It’ll be just as delicious when you’re ready to share it!
What else can I add to my *valentines bark*?
The beauty of *valentines bark* is its versatility! You can add all sorts of goodies like nuts, dried fruits, or even different types of candies. Think about your favorite flavors and get creative! Just remember to keep the balance in mind, so the bark doesn’t get too heavy.
Can I make this recipe gluten-free?
If you have any more questions or run into any hiccups while making your *valentines bark*, don’t hesitate to reach out! Happy baking!
Storage & Reheating Instructions
Storing your *valentines bark* properly is key to keeping it fresh and delicious! Once your bark has set and you’ve broken it into pieces, place it in an airtight container. I recommend using a container that’s not too big, so the pieces don’t shift around and get broken further. You can keep it at room temperature for about a week, just make sure it’s away from direct sunlight to maintain those vibrant colors and flavors.
As for reheating, there’s no need! *Valentines bark* is best enjoyed at room temperature, and reheating can ruin the delightful texture of your chocolate. If it does get a little melty from being out too long, just let it cool back down, and it’ll be as good as new! So, once you’ve made your bark, stash it away, and when you’re ready to enjoy it, just grab a piece and savor the sweetness!
Serving Suggestions
Now that you’ve whipped up a delightful batch of *valentines bark*, it’s time to think about how to serve it! This colorful treat is not just a feast for the eyes; it can also be a fantastic addition to various occasions. Here are some fun ideas to elevate your *valentines bark* experience:
- Pair with Ice Cream: Crumble some of your *valentines bark* over a scoop of vanilla or chocolate ice cream for an extra special dessert. The combination of creamy ice cream and crunchy bark is simply divine!
- Gift Baskets: Consider packaging your *valentines bark* in a cute gift basket alongside some other sweet treats, like cookies or chocolates. Add a personal touch with a handwritten note, and you’ve got a thoughtful gift for friends, family, or that special someone.
- Valentine’s Day Party Platter: Create a dessert platter for your Valentine’s Day gathering by mixing your *valentines bark* with other colorful desserts like cupcakes or chocolate-covered strawberries. It’ll be a showstopper that everyone will love!
- Sweet Snack Station: Set up a snack station during a movie night or game day. Place your *valentines bark* in a decorative bowl and let everyone grab a piece while they enjoy their time together. It’s a great way to add a little sweetness to the fun!
- Decorate Cakes or Cupcakes: Use chunks of *valentines bark* to decorate cakes or cupcakes. Not only does it add a beautiful touch, but it also brings that delicious chocolatey crunch to your baked goods.
No matter how you choose to serve your *valentines bark*, it’s sure to bring smiles and sweeten up any occasion. Enjoy every bite and the joy it brings to those you share it with!
Print
valentines bark: 5 Sweet Steps for a Colorful Treat
A sweet and colorful treat perfect for Valentine’s Day.
- Total Time: 20 minutes
- Yield: 12 servings 1x
Ingredients
- 12 ounces white chocolate chips
- 1 cup red and pink M&M’s
- 1/2 cup crushed peppermint candies
- 1/2 cup sprinkles
Instructions
- Melt the white chocolate chips in a microwave-safe bowl.
- Stir until smooth and completely melted.
- Pour the melted chocolate onto a parchment-lined baking sheet.
- Spread the chocolate evenly with a spatula.
- Sprinkle M&M’s, peppermint candies, and sprinkles on top.
- Let it cool at room temperature until set.
- Break into pieces and serve.
Notes
- Store in an airtight container.
- Use any color of M&M’s for different occasions.
- Can add nuts for extra crunch.
- Prep Time: 15 minutes
- Cook Time: 5 minutes
- Category: Dessert
- Method: No-Bake
- Cuisine: American
- Diet: Vegetarian
Nutrition
- Serving Size: 1 piece
- Calories: 150
- Sugar: 14g
- Sodium: 30mg
- Fat: 8g
- Saturated Fat: 5g
- Unsaturated Fat: 3g
- Trans Fat: 0g
- Carbohydrates: 18g
- Fiber: 1g
- Protein: 1g
- Cholesterol: 5mg
Keywords: valentines bark, chocolate bark, valentine treats