

There’s something incredibly joyful about making Valentine’s cake pops! It’s not just about the delightful flavors and adorable shapes; it’s about the love and care you put into every little ball of sweetness. I still remember the first time I made these for a school Valentine’s Day party. My kids were so excited to share them with their friends and watch their faces light up with delight. It was the perfect way to spread a little love and sweetness around!
This recipe is truly special for Valentine’s Day because it allows you to get creative with colors and decorations, making each cake pop a mini work of art. You can mix and match different chocolate melts for vibrant shades and use sprinkles that shine like confetti. Plus, the process is a great excuse to involve your kids or friends in the kitchen. Trust me, nothing beats the joy of seeing everyone gathered around, rolling cake pops and laughing together. These treats are not just desserts; they’re a way to share moments of joy and love. So, let’s dive into this fun and easy recipe that’s sure to make your Valentine’s Day unforgettable!
Why You’ll Love This Recipe
Making Valentine’s cake pops is more than just baking; it’s about creating sweet moments that you can share with loved ones. Here’s why this recipe is perfect for your Valentine’s Day celebrations:
- Adorable Presentation: Their cute, round shapes and vibrant colors make these cake pops a visual delight that will impress anyone.
- Fun to Make: Involving friends or family in the process turns baking into a joyful activity, filled with laughter and creativity.
- Customizable: You can experiment with different flavors of cake, colors of melts, and a variety of sprinkles to create your unique masterpiece.
- Perfect for Sharing: These bite-sized treats are easy to share, making them ideal for parties, classroom celebrations, or simply to brighten someone’s day.
- Quick and Simple: With just a few ingredients and minimal prep time, you can whip up a batch of these delightful sweets in no time!
So, whether you’re celebrating with a special someone or spreading love among friends, these Valentine’s cake pops are bound to make your day a whole lot sweeter!
Ingredients List
Let’s gather everything we need to create these delightful Valentine’s cake pops! Here’s what you’ll need:
- 1 box cake mix: Choose your favorite flavor—chocolate, vanilla, or even red velvet for that extra festive touch!
- 1 cup frosting: You can stick with classic vanilla, or get creative with flavors to complement your cake. Cream cheese frosting works wonders too!
- 1 cup chocolate melts: Grab some pink, red, or white chocolate melts to tie in that Valentine’s theme. They melt beautifully and coat the pops perfectly!
- Sprinkles: Use heart-shaped sprinkles, edible glitter, or any colorful sprinkles you love to give your cake pops a festive flair.
- Lollipop sticks: These help you serve your cake pops with style. They also make it easy for everyone to grab a treat and enjoy!
With these simple ingredients, you’re all set to create something truly special for Valentine’s Day. The best part? You can mix and match to make them uniquely yours!
How to Prepare Instructions
Alright, let’s get our hands a little messy and dive into making these adorable Valentine’s cake pops! I promise the process is just as fun as the end result. Follow these steps, and you’ll be well on your way to creating a delightful treat that everyone will love!
Baking the Cake
First things first—let’s bake the cake! Preheat your oven to the temperature specified on the cake mix box, usually around 350°F (175°C). Prepare your cake pan by greasing it lightly or lining it with parchment paper. Then, mix the cake batter according to the package instructions. Pour the batter into your prepared pan and bake for the time indicated on the box, typically about 25-30 minutes. You’ll know it’s done when a toothpick inserted into the center comes out clean. Once baked, let the cake cool completely in the pan for about 10 minutes before transferring it to a wire rack to cool completely.
Mixing Cake and Frosting
Once your cake is cool, it’s time to crumble it! Grab a large bowl and crumble the cooled cake into it using your hands or a fork. You want to break it down into fine crumbs for a smooth consistency. Next, add in the frosting—this is where the magic happens! Start with half a cup of frosting and mix it in with the cake crumbs until everything is well combined. The mixture should be moist but still hold its shape when pressed together. If it feels too dry, add more frosting a tablespoon at a time until you reach the perfect consistency.
Forming Cake Pops
Now comes the fun part—forming the cake pops! Take a small portion of the mixture and roll it between your hands to create uniform balls, about 1 inch in diameter. Try to keep them all the same size so they cook evenly. If you’re feeling extra fancy, you can use a cookie scoop to help with this step! Place the formed balls on a baking sheet lined with parchment paper. Once you’ve rolled them all, it’s time to move on to the next step.
Chilling and Sticking
Chilling is crucial for keeping your cake pops sturdy. Pop the baking sheet into the refrigerator for about 30 minutes. This helps the pops firm up, making them easier to dip later. While they’re chilling, take your lollipop sticks and melt just a bit of chocolate melts (about 1 tablespoon) in the microwave. This will act as glue! Once your cake pops are chilled, dip the tip of each lollipop stick into the melted chocolate before inserting it into the center of each ball. This helps the stick stay put when you dip them later.
Dipping and Decorating
Now for the grand finale—dipping! Melt your chocolate melts according to the package instructions, usually in 30-second intervals in the microwave, stirring in between until smooth. Once melted, dip each cake pop into the chocolate, swirling it around to ensure it’s fully coated. Allow any excess chocolate to drip off before decorating. While the chocolate is still wet, sprinkle on your festive toppings—think heart-shaped sprinkles or edible glitter! Place the decorated pops upright in a foam block or a cup filled with rice to let them set. And there you have it—beautifully crafted Valentine’s cake pops ready to share with your loved ones!
Tips for Success
To ensure your Valentine’s cake pops turn out perfectly every single time, I’ve gathered some pro tips that I’ve learned through trial and error (and a few messy kitchens!). Trust me, these little nuggets of wisdom will elevate your cake pop game and make the process even more enjoyable!
Keep Your Cake Cool
Once your cake is baked and cooled, don’t rush the crumbling process! Allow it to cool completely before mixing with frosting. This will prevent your mixture from becoming too gooey and hard to work with. You want a nice, crumbly texture that binds well without being overly wet.
Consistency is Key
When mixing the cake and frosting, aim for a consistency that holds its shape without crumbling apart. If you find your mixture is too dry, add a bit more frosting, but do it gradually! You want that perfect balance where the pops are moist but not soggy.
Chill, Chill, Chill!
Chilling your cake pops is crucial. Not only does it help them firm up, but it also ensures they won’t fall apart when you dip them in chocolate. If you’re short on time, pop them in the freezer for about 15 minutes instead of the refrigerator. Just keep an eye on them to prevent freezing!
Decorating Tips
When it comes to decorating, the world is your oyster! Don’t be afraid to get creative with your toppings. Try drizzling contrasting colors of melted chocolate over the dipped pops for a fun effect. You can also use edible glitter, coconut flakes, or even crushed candies for extra flair. Just make sure to sprinkle on your toppings while the chocolate is still wet, so they stick well!
Storage Suggestions
Once your cake pops are set, store them in an airtight container at room temperature for up to a week. If you’re in a warm climate, it’s best to keep them in the fridge to avoid melting. Just bring them back to room temperature before serving to enjoy their full flavor and texture!
With these tips in your back pocket, you’re all set to create the most delightful Valentine’s cake pops that will wow your loved ones. Happy baking!
Variations
One of the best things about making Valentine’s cake pops is how versatile they can be! You can easily mix things up to create different flavors and designs, so let your creativity shine! Here are some fun variations to consider:
- Flavor Swaps: Instead of sticking with a classic vanilla or chocolate cake mix, why not try fun flavors like red velvet, lemon, or even funfetti? Each flavor adds a unique twist and makes your cake pops stand out!
- Colorful Melts: Go wild with your chocolate melts! You can find melts in a rainbow of colors—think pastel pinks, vibrant reds, or even blue and green for a whimsical touch. Mixing different colors can make your pops even more festive!
- Unique Toppings: Get creative with your toppings! Instead of just sprinkles, consider using crushed nuts, cookie crumbs, or even mini marshmallows for a fun texture. Drizzle melted white chocolate or colored melts over the top for a beautiful design!
- Stuffed Cake Pops: For an extra surprise, try stuffing your cake pops with a filling! You can use a dollop of peanut butter, ganache, or even fruit preserves in the center before rolling them into balls. It adds a delightful burst of flavor!
- Themed Decorations: If you’re feeling extra festive, decorate your pops to match different holidays or occasions. Use seasonal sprinkles or edible googly eyes for Halloween, or pastel colors for Easter. The possibilities are endless!
These variations not only make the baking process more exciting but also help you create truly unique treats that reflect your personal style. So, grab your ingredients and have fun experimenting with different flavors and designs for your Valentine’s cake pops!
Nutritional Information
When it comes to our delightful Valentine’s cake pops, it’s always nice to know what you’re indulging in. Here’s an estimated nutritional breakdown for each cake pop, so you can enjoy them with a bit of mindfulness:
- Calories: 150
- Sugar: 10g
- Fat: 6g
- Saturated Fat: 3g
- Unsaturated Fat: 2g
- Trans Fat: 0g
- Carbohydrates: 20g
- Fiber: 1g
- Protein: 2g
- Cholesterol: 15mg
- Sodium: 50mg
Keep in mind that these values are estimates and can vary based on the specific brands and ingredients you use. Whether you indulge in one or share a few, these sweet treats are sure to bring smiles and joy this Valentine’s Day!
Storage & Reheating Instructions
Once you’ve created your adorable Valentine’s cake pops, you’ll want to make sure they stay fresh and delightful for as long as possible. Here’s how to store and enjoy them later without losing that amazing taste!
To store your cake pops, simply place them in an airtight container. If you’ve coated them in chocolate, it’s best to keep them at room temperature, away from direct sunlight or heat sources. They’ll stay fresh for up to a week this way! If you’re in a warmer climate, I recommend popping them in the refrigerator to prevent any melting. Just remember to let them come back to room temperature before serving, as this helps to restore their soft, delectable texture.
If you have any leftover pops, you can freeze them for longer storage. Just make sure they’re fully set and cooled, then place them in a single layer on a baking sheet to freeze for about an hour. Once they’re firm, transfer them to a freezer-safe bag or container. They can last up to three months in the freezer. When you’re ready to enjoy them, let them thaw in the fridge overnight, then bring them back to room temperature before serving.
Reheating isn’t really necessary for cake pops, but if you ever find yourself wanting to enjoy that fresh-out-of-the-kitchen taste, you can try warming them in the microwave for just a few seconds. Be careful not to overdo it, as you don’t want to melt the chocolate coating! Just a gentle warm-up should do the trick.
With these storage and reheating tips, you can savor your Valentine’s cake pops long after you’ve made them, sharing the love with everyone around you!
FAQ Section
As you dive into making these delightful Valentine’s cake pops, you might have a few questions popping up! Don’t worry, I’ve got you covered with answers to some of the most common queries:
Can I use any flavor of cake mix for my cake pops?
Absolutely! You can use any flavor of cake mix that you love. Chocolate, vanilla, red velvet, or even lemon cake can all work beautifully. Just choose your favorite, and let your taste buds lead the way!
How do I store my Valentine’s cake pops?
To keep your cake pops fresh and delicious, store them in an airtight container. If they’re coated in chocolate, keep them at room temperature for up to a week. In warmer climates, it’s best to refrigerate them to prevent melting. Just let them come back to room temperature before enjoying!
What’s the best way to decorate my cake pops?
Getting creative with decorations is half the fun! While the chocolate coating is still wet, sprinkle on your favorite toppings like heart-shaped sprinkles, edible glitter, or even crushed cookies. You can also drizzle contrasting colors of melted chocolate for a beautiful design. Just make sure to decorate while the chocolate is wet so everything sticks nicely!
Can I freeze my cake pops?
Yes, you can freeze your cake pops! After they’ve been fully set and cooled, place them in a single layer on a baking sheet to freeze for about an hour. Once firm, transfer them to a freezer-safe bag or container. They can last up to three months in the freezer. Just thaw them in the fridge overnight before serving for the best texture!
How can I make my cake pops extra moist?
To ensure your cake pops are moist and delicious, make sure to crumble the cake properly and mix it with just the right amount of frosting. If your mixture feels too dry, add a little more frosting until you achieve that perfect consistency. Chilling the pops also helps keep them from drying out during the dipping process!
Can I make these cake pops ahead of time?
Definitely! You can prepare the cake pops a day or two in advance. Just make sure to store them properly in an airtight container. They’re perfect for making ahead of time, so you can enjoy stress-free baking closer to the special day!
With these FAQs answered, you’ll be well on your way to creating the cutest and tastiest Valentine’s cake pops ever. Happy baking and sharing the love!
Print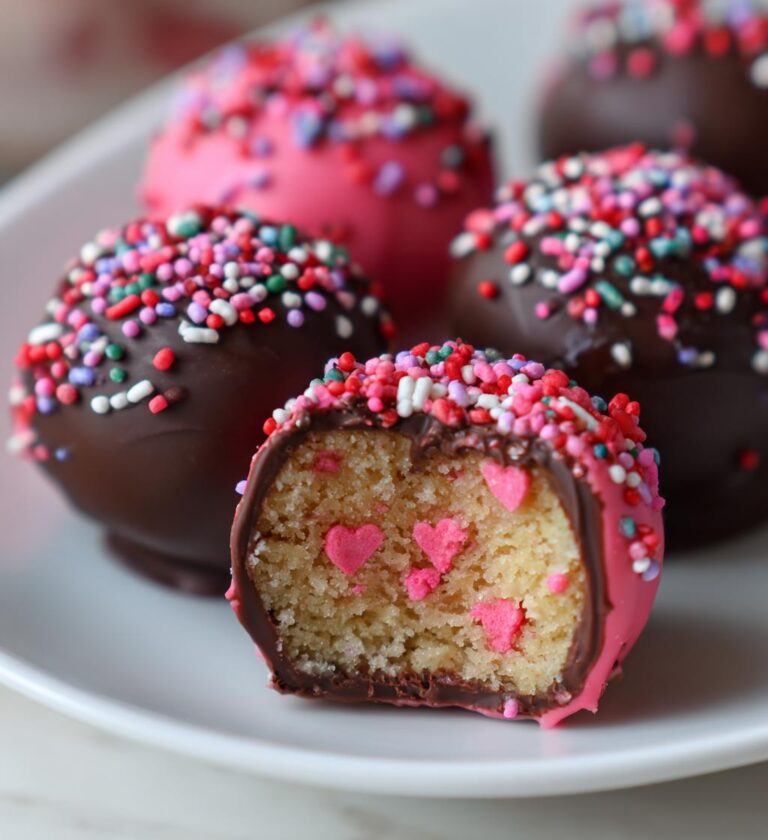
valentines cakepops: 5 Creative Ways to Spread Sweet Joy
Delicious cake pops shaped for Valentine’s Day.
- Total Time: 1 hour
- Yield: 24 cake pops 1x
Ingredients
- 1 box cake mix
- 1 cup frosting
- 1 cup chocolate melts
- Sprinkles
- Lollipop sticks
Instructions
- Bake the cake according to the package instructions.
- Let the cake cool completely.
- Crumble the cake into a large bowl.
- Add frosting and mix until combined.
- Form the mixture into small balls.
- Insert lollipop sticks into each ball.
- Chill in the refrigerator for 30 minutes.
- Melt chocolate melts in a microwave.
- Dip each cake pop into the melted chocolate.
- Sprinkle with toppings.
- Let them set on a baking sheet.
Notes
- Use different colors of melts for variety.
- Store in a cool place.
- Use silicone molds for perfect shapes.
- Prep Time: 20 minutes
- Cook Time: 30 minutes
- Category: Dessert
- Method: Baking and dipping
- Cuisine: American
- Diet: Vegetarian
Nutrition
- Serving Size: 1 cake pop
- Calories: 150
- Sugar: 10g
- Sodium: 50mg
- Fat: 6g
- Saturated Fat: 3g
- Unsaturated Fat: 2g
- Trans Fat: 0g
- Carbohydrates: 20g
- Fiber: 1g
- Protein: 2g
- Cholesterol: 15mg
Keywords: valentines cakepops